
Post-Purchase campaign
Offer a one-click upsell on a dedicated page right after checkout, before the thank-you page, with an optional downsell offer.
A Post-Purchase campaign shows a special offer on a dedicated page that appears the moment a customer completes their order — after they pay, but before they reach the thank-you page. Because the order is already placed, the customer can accept the offer in a single click and have it added to their existing order, with no need to re-enter payment details.
Post-purchase offers are perfect for special, discounted, or seasonal products you want to reserve for customers who have just bought from you. The offer never appears until the purchase is complete, so it can never get in the way of the original sale.
What a Post-Purchase campaign does
When a customer finishes checkout, Llama Upsells displays a full-page offer before the thank-you page loads. From there, the customer can:
- Accept the offer, which adds the product to the order they just placed.
- Decline the offer and continue to the thank-you page.
You can also configure a downsell — a second, fallback offer that only appears if the customer declines your primary offer. This gives you a chance to win the sale with a lower-commitment or lower-priced alternative.
Because the offer lives on Shopify's native post-checkout surface, you do not need to edit your theme to use it.
How to set it up
Create the campaign
From the Campaigns page, create a new Post-Purchase campaign.
Choose the offer product
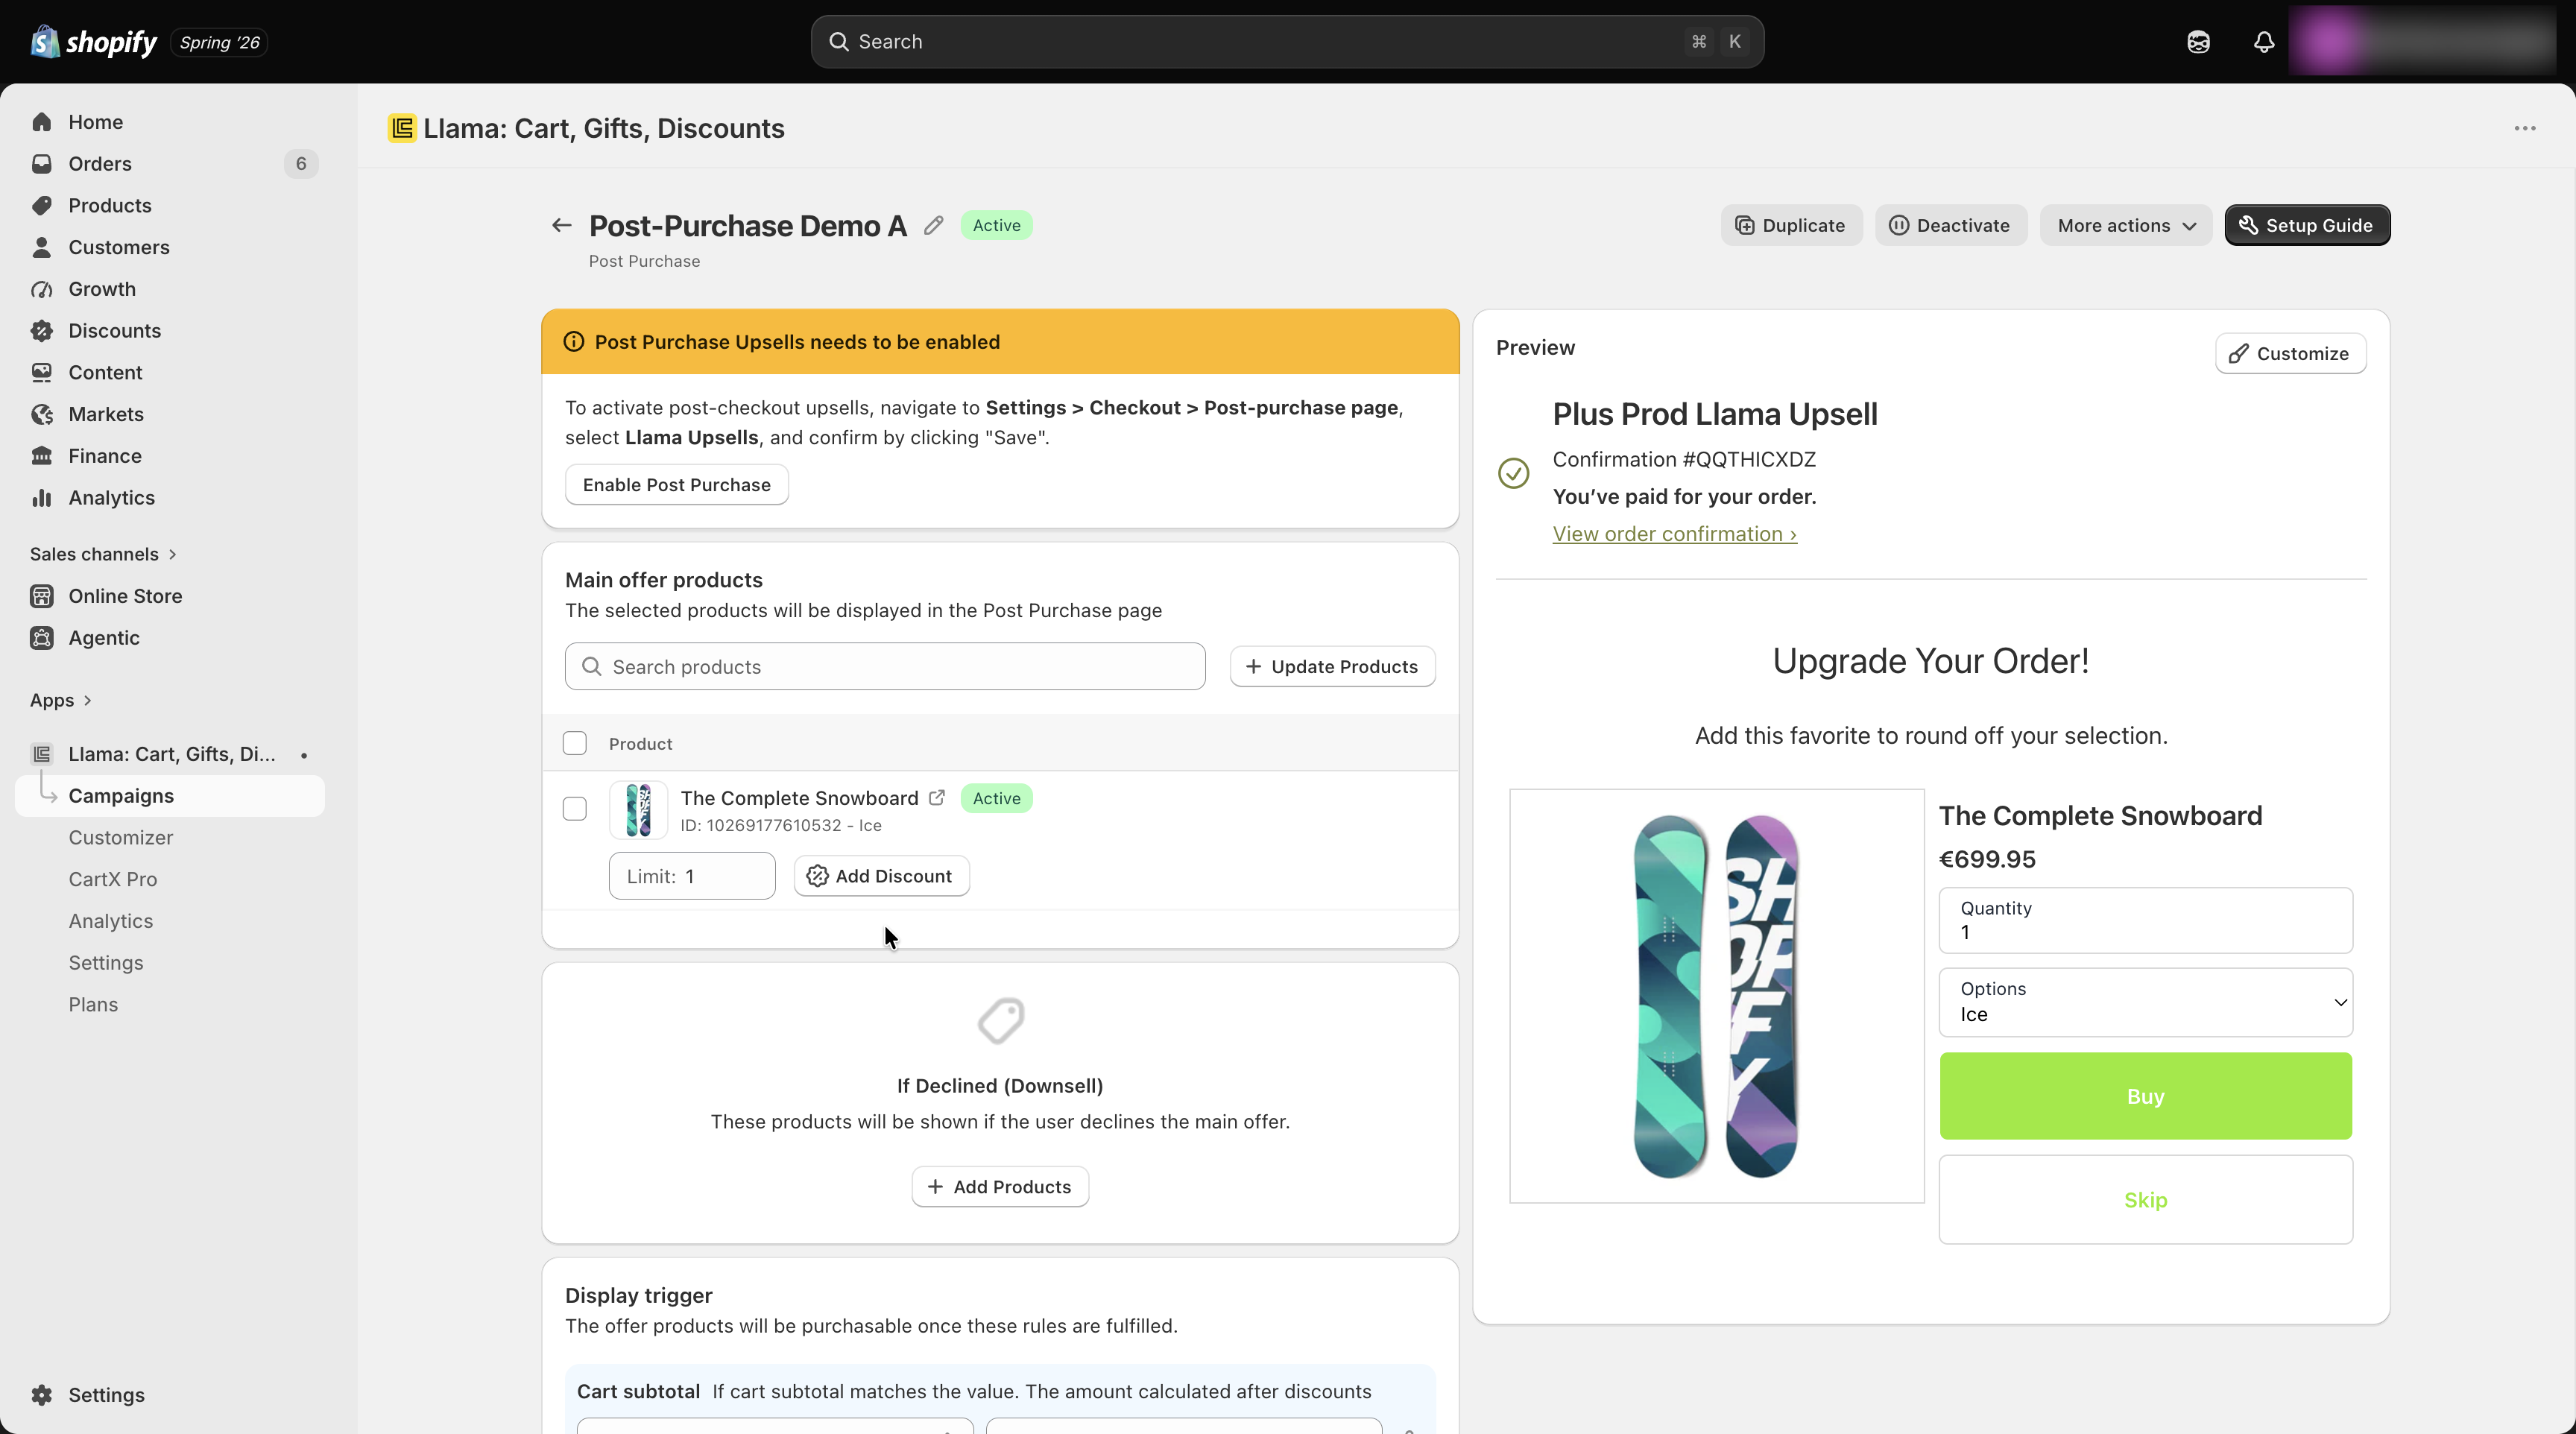
Select the product (or products) you want to recommend after checkout. You can pick products in one of three ways:
- Manual selection — choose specific product variants yourself.
- Automatic recommendations — let Shopify's recommendation engine suggest products based on the order.
- Collection — draw the offer from a collection you specify.
Add a discount (optional)
A Post-Purchase offer can carry a per-variant discount that is applied automatically when the customer accepts. Use it to make the post-checkout offer more tempting than the regular price.
Set up a downsell (optional)
Configure a downsell offer that appears only if the customer declines your primary offer, so you get a second chance to convert. The downsell carries its own products, discount, and quantity limits, separate from the main offer. See the advanced guide for exactly when and how the downsell is shown.
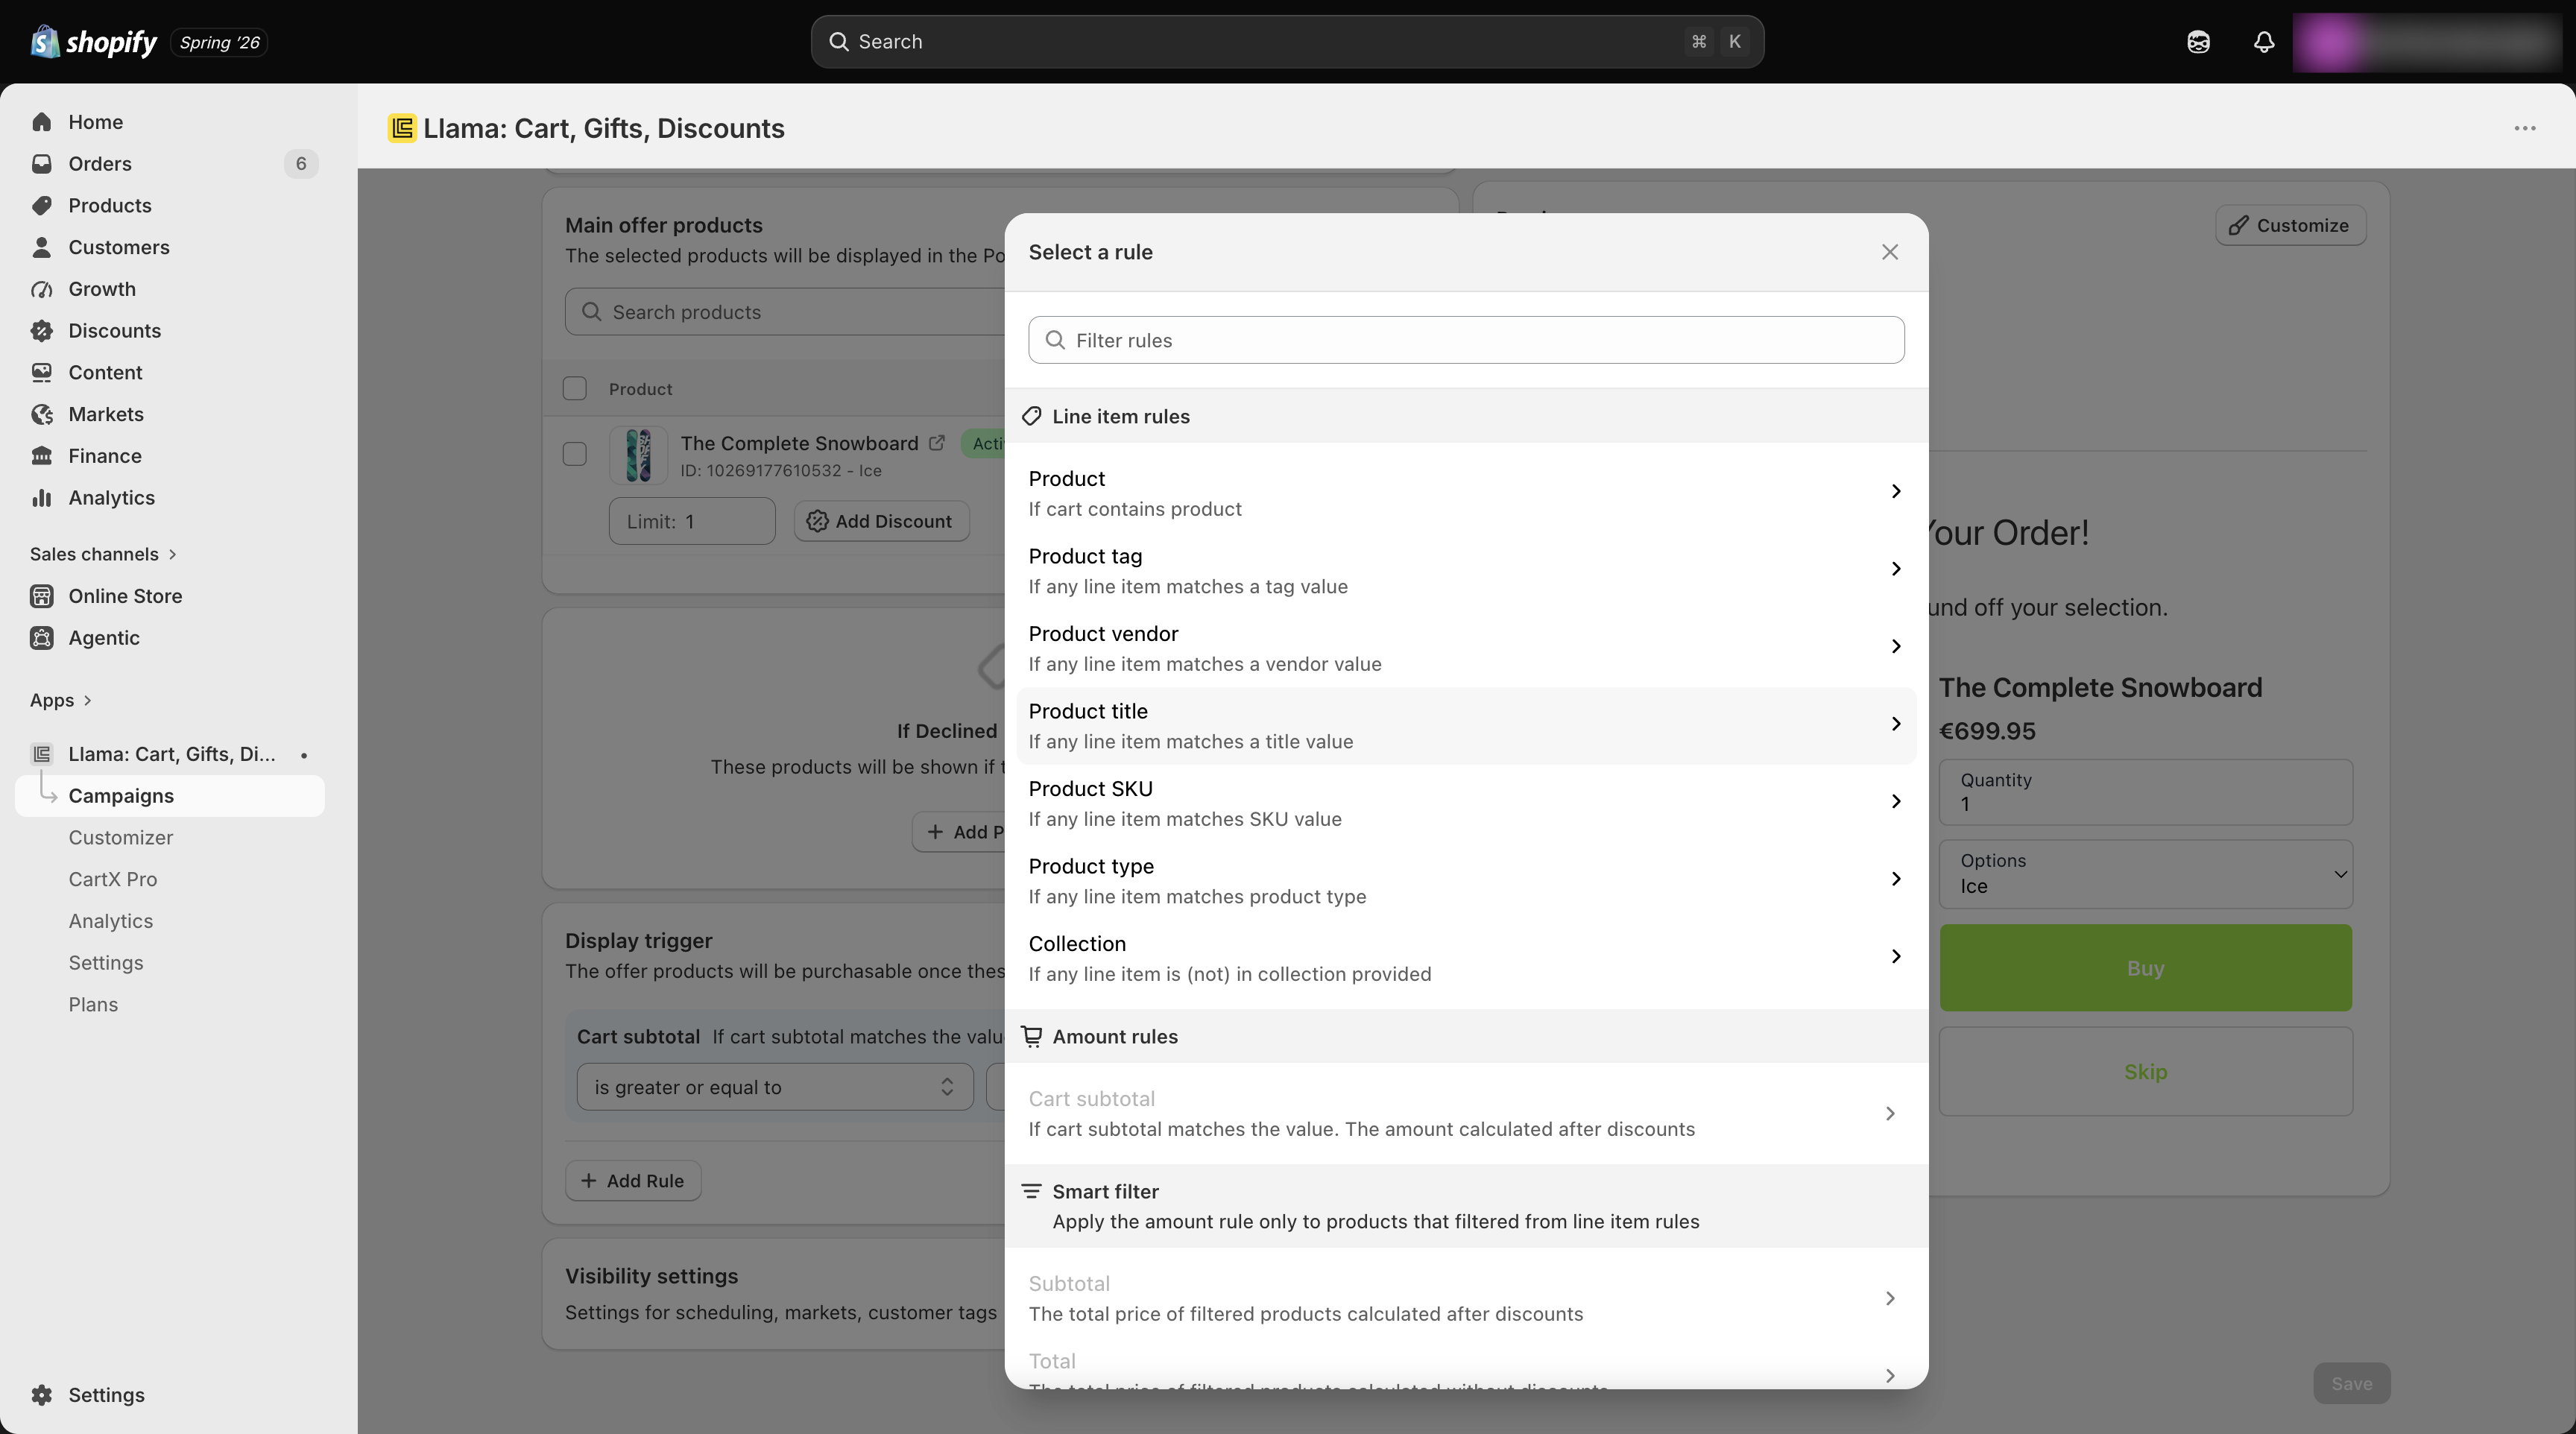
Set the conditions
Choose the rules that decide which orders see the offer — for example, the products in the order, the cart subtotal, customer tags, or applied discount codes.
Customize the layout
Use the campaign customizer to style the offer page to match your brand — colors, border radius, font size, the offer title and description, button labels, and whether to show price, compare-at price, and discount badges.
Set visibility and schedule
Choose when and to whom the campaign runs, then save to activate it.
Layout and content settings
The Post-Purchase offer is a full-page experience shown on Shopify's post-checkout surface, so you do not place it anywhere in your theme. Instead, you control how it looks through the campaign customizer, which is organized into sections.
| Section | What you control |
|---|---|
| Title | The rich-text heading shown above the offer, plus a separate When Offer Declined heading used for the downsell. A Spacer (0–25, default 5) sets the space below it. |
| Description | The rich-text description, plus its own When Offer Declined variant for the downsell, and a matching Spacer (default 5). |
| Buttons | The accept-button labels (Add button text, default Buy; Adding / Added states), an optional Include price toggle (default off) that prints the price on the button, and the decline button's Text (default Skip), Position (Top or Bottom, default Bottom), and a Display as a link option. |
| Labels | Reusable text for Free shipping, Free product, the Discounted price label (default (Save {{ percentage }})), Quantity, Options, and the OR divider. |
| Timer | The optional countdown — see Timer below. |
| Product Cards | Layout (Horizontal or Vertical, default Horizontal), Products per row (1–3, default 2), a toggle to Disable quantity selector, a free shipping label toggle, and image-thumbnail controls (up to 4 thumbnails by default, or Show all thumbnails). |
Button colors and a few other styles for the post-purchase page come from Shopify's own Checkout Customizer (Settings → Checkout → Customize), not from the Llama customizer. The Buttons section links you straight there.
Timer
The Timer section adds an urgency countdown to the offer page. It is off by default. When enabled, the offer shows a timer banner and the following settings apply:
| Setting | Default | Effect |
|---|---|---|
| Enable timer | Off | Turns the countdown on. |
| Hide timer banner | Off | Keeps the timer running but hides the colored banner (use the timer tag inside your title or description instead). |
| Timer text | "Offer ends in {timer}" | The banner copy. Insert the {timer} tag to print the live countdown. |
| Duration | 5 min | How long the countdown runs, from 1 to 20 minutes. |
| Background color | Yellow | The banner color: Yellow, Blue, Green, or Red. |
The timer does more than create urgency — when it reaches zero, the offer auto-completes and the customer is sent on to the thank-you page. Once it expires, the offer can no longer be accepted, so keep Duration comfortably long enough for a shopper to read the offer and decide. The exact countdown behavior is documented in the advanced guide.
Visibility and targeting
On a Post-Purchase campaign you can set:
- Date range — the campaign only runs between a start and end date and time.
- Markets — the campaign only runs for customers in the Shopify markets you select.
- Customer tags — restrict the offer to logged-in customers with specific tags.
A campaign can be active, inactive, or draft. Only active campaigns are shown to shoppers and count toward your plan's campaign limit.
When multiple offers could match
If you run more than one Post-Purchase offer and their conditions could match the same order, they are evaluated in the priority order you set, and the first match is the only offer the customer sees. The full ranking rules, how ties are broken, and what happens when an offer's products are removed are covered in the advanced guide.
Each Post-Purchase offer is attached to exactly one condition, and each condition can back only one Post-Purchase offer (its conditionId is unique). If you try to reuse a condition that already powers another Post-Purchase offer, the second one will not save. To run two different post-purchase offers, give each its own condition — and, since a condition belongs to a campaign, that usually means a separate campaign.
Post-Purchase advanced: priority, downsell & timer
How offers are ranked and validated, how the declined-offer downsell works, and how the countdown timer behaves.
Keep an eye on the campaign list for warning icons. The app flags a Post-Purchase campaign when its offer products are unpublished or sold out, a referenced collection has been deleted, a promo-code trigger points to a disabled discount, no markets are selected, or the schedule window has not started yet or has already ended.
Use cases
Key takeaways
- The offer appears on a dedicated page after checkout completes and before the thank-you page.
- Customers can accept (adding the product to their order) or decline.
- An optional downsell appears only when the primary offer is declined.
- A per-variant discount can be applied automatically when the offer is accepted.
- No theme editing is required — styling is handled in the campaign customizer.
- Each condition can back only one Post-Purchase offer; multiple matching offers are shown in the priority order you set.
- An optional timer auto-completes the offer when it expires, so set the duration with care.
Related campaigns
How gift product data loads & caching
Why your Gift-with-Purchase widget can take a few minutes to reflect product changes, and how to push updates through sooner.
Post-Purchase offers in depth - accept, decline & downsell
How the two-stage post-purchase offer surface works — the main offer, the downsell fallback, one-click order edits, and every error a customer can hit.