
Designing the post-purchase offer page
Style the full-page post-purchase offer with rich-text titles, dynamic tags, downsell variants, and configurable buttons and labels.
The post-purchase offer is a full page shown to a shopper after they complete checkout, just before Shopify's thank-you page. Its customizer works differently from your other widgets: instead of a fixed layout with separate heading and font controls, the Title and Description are rich-text fields with insertable dynamic tags, and the offer has a built-in downsell variant for shoppers who decline the first offer.
This guide walks through every section of the post-purchase customizer so you can write the copy, wire up the buttons, and label the offer exactly how you want it. To set up the offer logic itself (which products show, priority, and timing), see Post-Purchase campaign.
Where the post-purchase offer appears
The post-purchase offer is a single full page that loads after the shopper pays but before they reach the thank-you page. Unlike the slider and list widgets, it has only one layout — there is no Slider/List choice. The customizer is organized into sections you work through top to bottom:
| Section | What it controls |
|---|---|
| Title | The main headline and the declined-offer headline (rich text) |
| Description | The supporting copy and the declined-offer copy (rich text) |
| Buttons | The purchase (buy) button states and the decline (skip) button |
| Labels | Reusable text for shipping, free, discount, quantity, and timer messaging |
Because there's a single layout, everything you change here applies to the one page shoppers see — there's no per-format styling to keep in sync.
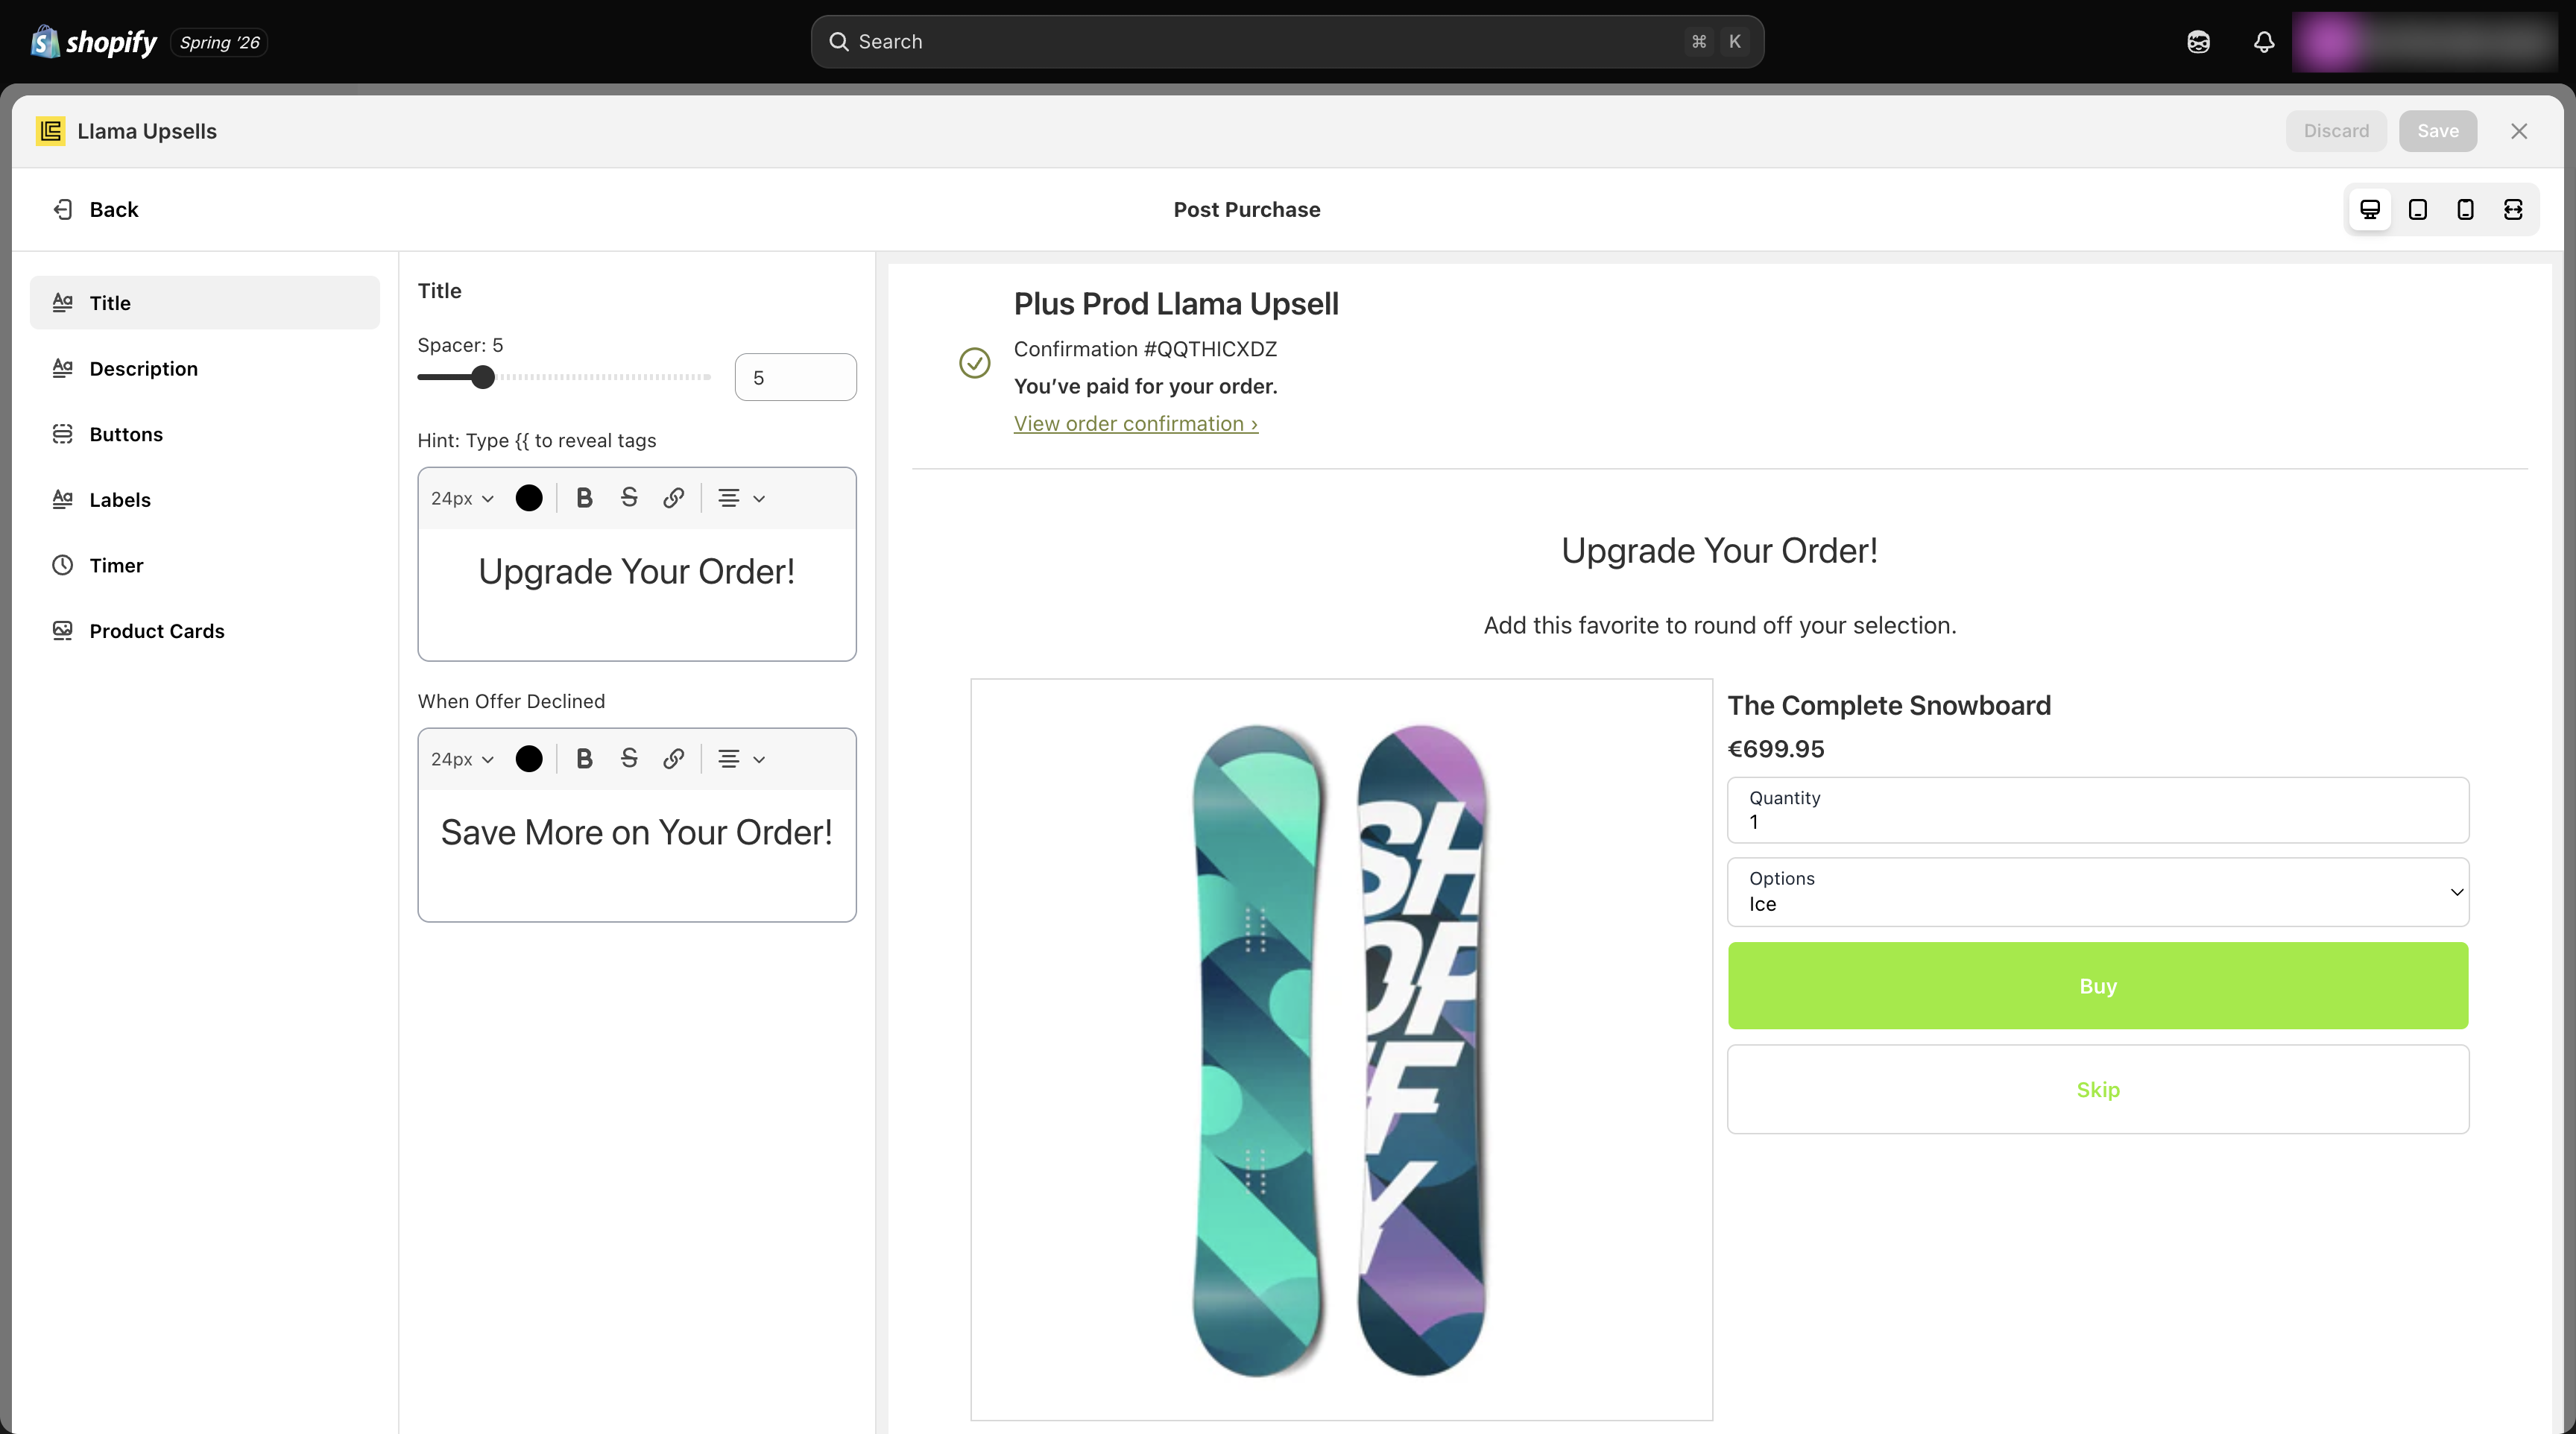
Rich text with dynamic tags
The Title and Description are rich-text editors, not plain text boxes. You can apply formatting (such as font size and center alignment) directly to the words, and — most importantly — you can insert dynamic tags that get replaced with live values when the page renders for a shopper.
Inserting a tag
While editing a Title or Description field, type two open braces ({{) to reveal the tag picker. A mention list appears with the variables you can insert, such as the product name and price. Pick one and it drops in as a styled tag rather than literal text. The field label even reminds you: Hint: Type {{ to reveal tags.
Dynamic tags are placeholders, not final values. The app substitutes them at render time using the actual offer product and price, so a tag like a price variable always reflects what the shopper is being offered — you never have to hard-code a number.
Default copy
If you don't change anything, the offer ships with this copy:
| Field | Default text | Default size |
|---|---|---|
Title (title) | Upgrade Your Order! | 24px, centered |
Description (description) | Add this favorite to round off your selection. | 16px, centered |
Spacing each field
Each rich-text field has its own Spacer slider that controls the vertical space around it:
| Setting | Field | Range | Default |
|---|---|---|---|
Spacer (titleSpacer) | Title | 0–25 | 5 |
Spacer (descriptionSpacer) | Description | 0–25 | 5 |
Lower the spacer to tighten the layout and pull the headline closer to the description; raise it to give the copy more breathing room.
Downsell variants
Every offer has a fallback: if the shopper declines the main offer, the page can immediately show a downsell — a second, lower-commitment offer — using its own headline and copy. You write the downsell wording in the same Title and Description sections, in the field marked When Offer Declined.
| Field | What it is | Default text |
|---|---|---|
When Offer Declined — Title (downsellTitle) | Headline shown after the main offer is declined | Save More on Your Order! |
When Offer Declined — Description (downsellDescription) | Supporting copy shown with the downsell | Get this special deal to complement your order at a discounted price. |
These are also rich-text fields, so the same formatting and {{ dynamic tags work in the downsell variant. For how the decline-then-downsell flow is decided and timed, see Post-Purchase offers in depth.
The downsell only renders when a downsell offer exists for the campaign and the shopper declines the main offer. If there's no downsell to show, declining simply moves the shopper on to the thank-you page.
Buttons section
The Buttons section configures the two actions on the offer: the Purchase button that adds the offer to the order, and the Decline button that skips it.
Purchase button
The purchase button has three text states plus a price toggle:
| Setting | What it does | Default |
|---|---|---|
Add button text (buyButtonText) | Label before the shopper clicks | Buy |
Adding text (addingButtonText) | Label while the order is being updated | Loading... |
Added text (addedButtonText) | Label once the offer is added | Added! |
Include price (includePriceOnButton) | Appends the offer price to the button label | Off |
Turn on Include price when you want the cost of accepting the offer to be obvious on the button itself — for example, so the button reads as a buy action with the amount attached instead of a bare "Buy".
Decline button
The decline button lets the shopper pass on the offer:
| Setting | What it does | Default |
|---|---|---|
Text (skipButtonText) | Label for the decline action | Skip |
Position (skipButtonPosition) | Where the decline button sits — Top or Bottom | Bottom |
Display as a link (skipButtonPlain) | Renders the decline action as a plain text link instead of a button | Off |
Position the decline button at the Top when you want shoppers to be able to dismiss the page quickly, or keep it at the Bottom (the default) so the purchase action is the most prominent choice. Turning on Display as a link de-emphasizes the decline action visually, which keeps attention on accepting the offer.
Button colors and extra styles live in Shopify's Checkout Customizer, not here. This section controls the button text, position, and link/button style — but the actual button colors and additional styling come from your checkout branding. Use the Checkout Customizer link at the bottom of the Buttons section to open Shopify's checkout editor and set those colors there.
Labels section
The Labels section holds the small, reusable bits of text the offer page uses to describe pricing and inputs. Set them once and they apply across the offer card.
| Setting | What it labels | Default |
|---|---|---|
Free shipping label (freeShippingLabel) | Marks an offer that ships free | Shipping |
Free product label (freeProductLabel) | Marks a free product | Free |
Discounted price label (discountedPriceLabel) | Shows the savings on a discounted offer | (Save {{ percentage }}) |
Quantity input label (quantityInputLabel) | Labels the quantity selector | Quantity |
| Timer message | The countdown message shown when the offer timer is on | — |
The Discounted price label is special: include the {{ percentage }} tag anywhere in the text and the app prints the actual discount percentage in its place. So the default (Save {{ percentage }}) renders as something like (Save 20%) for a 20%-off offer. You can reword it freely — for example, to You save {{ percentage }}! — as long as you keep the {{ percentage }} tag intact.
The timer message is the countdown line shown when you enable the offer timer for the campaign. It uses a {timer} tag that's replaced with the live countdown. For the full timer setup, see Post-Purchase advanced — priority, downsell & timer.
Edge cases and complex scenarios
Keep dynamic tags and placeholders intact
Every dynamic value on the page — a price variable, {{ percentage }}, {timer} — is a placeholder that the app substitutes when the page renders. Treat these tags as atomic.
Don't retype, split, or partially delete a tag. If you type {{ percentage }} as separate characters or remove part of the discounted-price tag, the app can't match it and the offer will print the literal text instead of the real percentage or countdown. When in doubt, clear the field and re-insert the tag using the {{ picker (for rich-text fields) so it's stored as a proper tag.
The offer only renders for eligible orders
A beautifully styled offer is only worth it if shoppers actually see it. The post-purchase page is shown only for eligible orders and payment methods — some payment methods and order shapes can't support a post-purchase upsell, so the page is skipped for those checkouts.
If your offer isn't appearing, the design isn't the problem — it's eligibility. Confirm the campaign is set up correctly in Post-Purchase campaign, check the supported payment methods and order shapes in Post-Purchase eligibility & payment-method limits, and if the offer is missing specifically in Shop Pay, see Upsells not showing in Shop Pay. For a full skip checklist, see Why a Post-Purchase offer didn't appear.
All of this text is translatable
Every piece of copy you write here is translatable, so shoppers in different markets see the offer in their language. The translatable post-purchase fields are the main title (title), main description (description), declined-offer title (downsellTitle), declined-offer description (downsellDescription), purchase button text (buyButtonText), decline button text (skipButtonText), and the timer message.
To add translations, see Translating content.
When you translate a field that contains a dynamic tag, keep the tag exactly as-is in every language — translate the words around it, not the tag. The placeholder is substituted with the same live value regardless of language.
Recipe: a two-state offer with a price-on-button and a top decline link
This recipe builds a confident upgrade offer that also catches decliners with a downsell, shows the cost on the buy button, and keeps the decline action low-key at the top of the page.
Write the main Title and Description
In the Title section, set the Title to your upgrade headline (default Upgrade Your Order!). In the Description section, set the Description to your supporting copy (default Add this favorite to round off your selection.). Use {{ to insert the product or price tag if you want the offer to name itself. Adjust the Spacer sliders (0–25, default 5) to taste.
Write the downsell variant
Still in the Title and Description sections, fill in the When Offer Declined fields. Keep the savings angle — the defaults are Save More on Your Order! and Get this special deal to complement your order at a discounted price. — so shoppers who passed on the upgrade get a softer, cheaper second chance.
Show the price on the buy button
In the Buttons section, set the purchase button states — for example Buy, Loading..., Added! — then turn on Include price so the cost of accepting is right on the button.
Make decline a top-positioned plain link
In the same Buttons section, set the decline Text (for example, No thanks), change Position to Top, and turn on Display as a link. The decline action now sits at the top as an understated text link, keeping the prominent buy button as the obvious choice.
Set your labels and the discount tag
In the Labels section, confirm the Discounted price label keeps the {{ percentage }} tag (default (Save {{ percentage }})) so the real savings print on discounted offers, and adjust the Free shipping, Free product, and Quantity labels to match your store's voice.
Set the button colors in Shopify
Because button colors come from your checkout branding, open the Checkout Customizer link in the Buttons section and set the buy and decline button colors in Shopify's checkout editor so they match your brand.
Troubleshooting
Where to go next
Post-Purchase campaign
Set up which products show, priority, and the downsell offer.
Post-Purchase offers in depth
How accept, decline, and downsell flow together end to end.
Translating content
Show your post-purchase copy in every market's language.
Customizing widget appearance
Style your other storefront upsell and gift widgets.